Rustic Live Edge Mirror
Introduction
Amidst the joy of last Christmas, a delightful surprise for our daughter unfolded - a charming small pool table. However, as the room embraced this new addition, a creative itch took hold, inspiring me to elevate the space further. Join me in this detailed narrative as we delve into the meticulous craftsmanship of a rustic live-edge elm mirror, designed to enhance the ambiance surrounding our pool table area.
Choosing Quality Live Edge
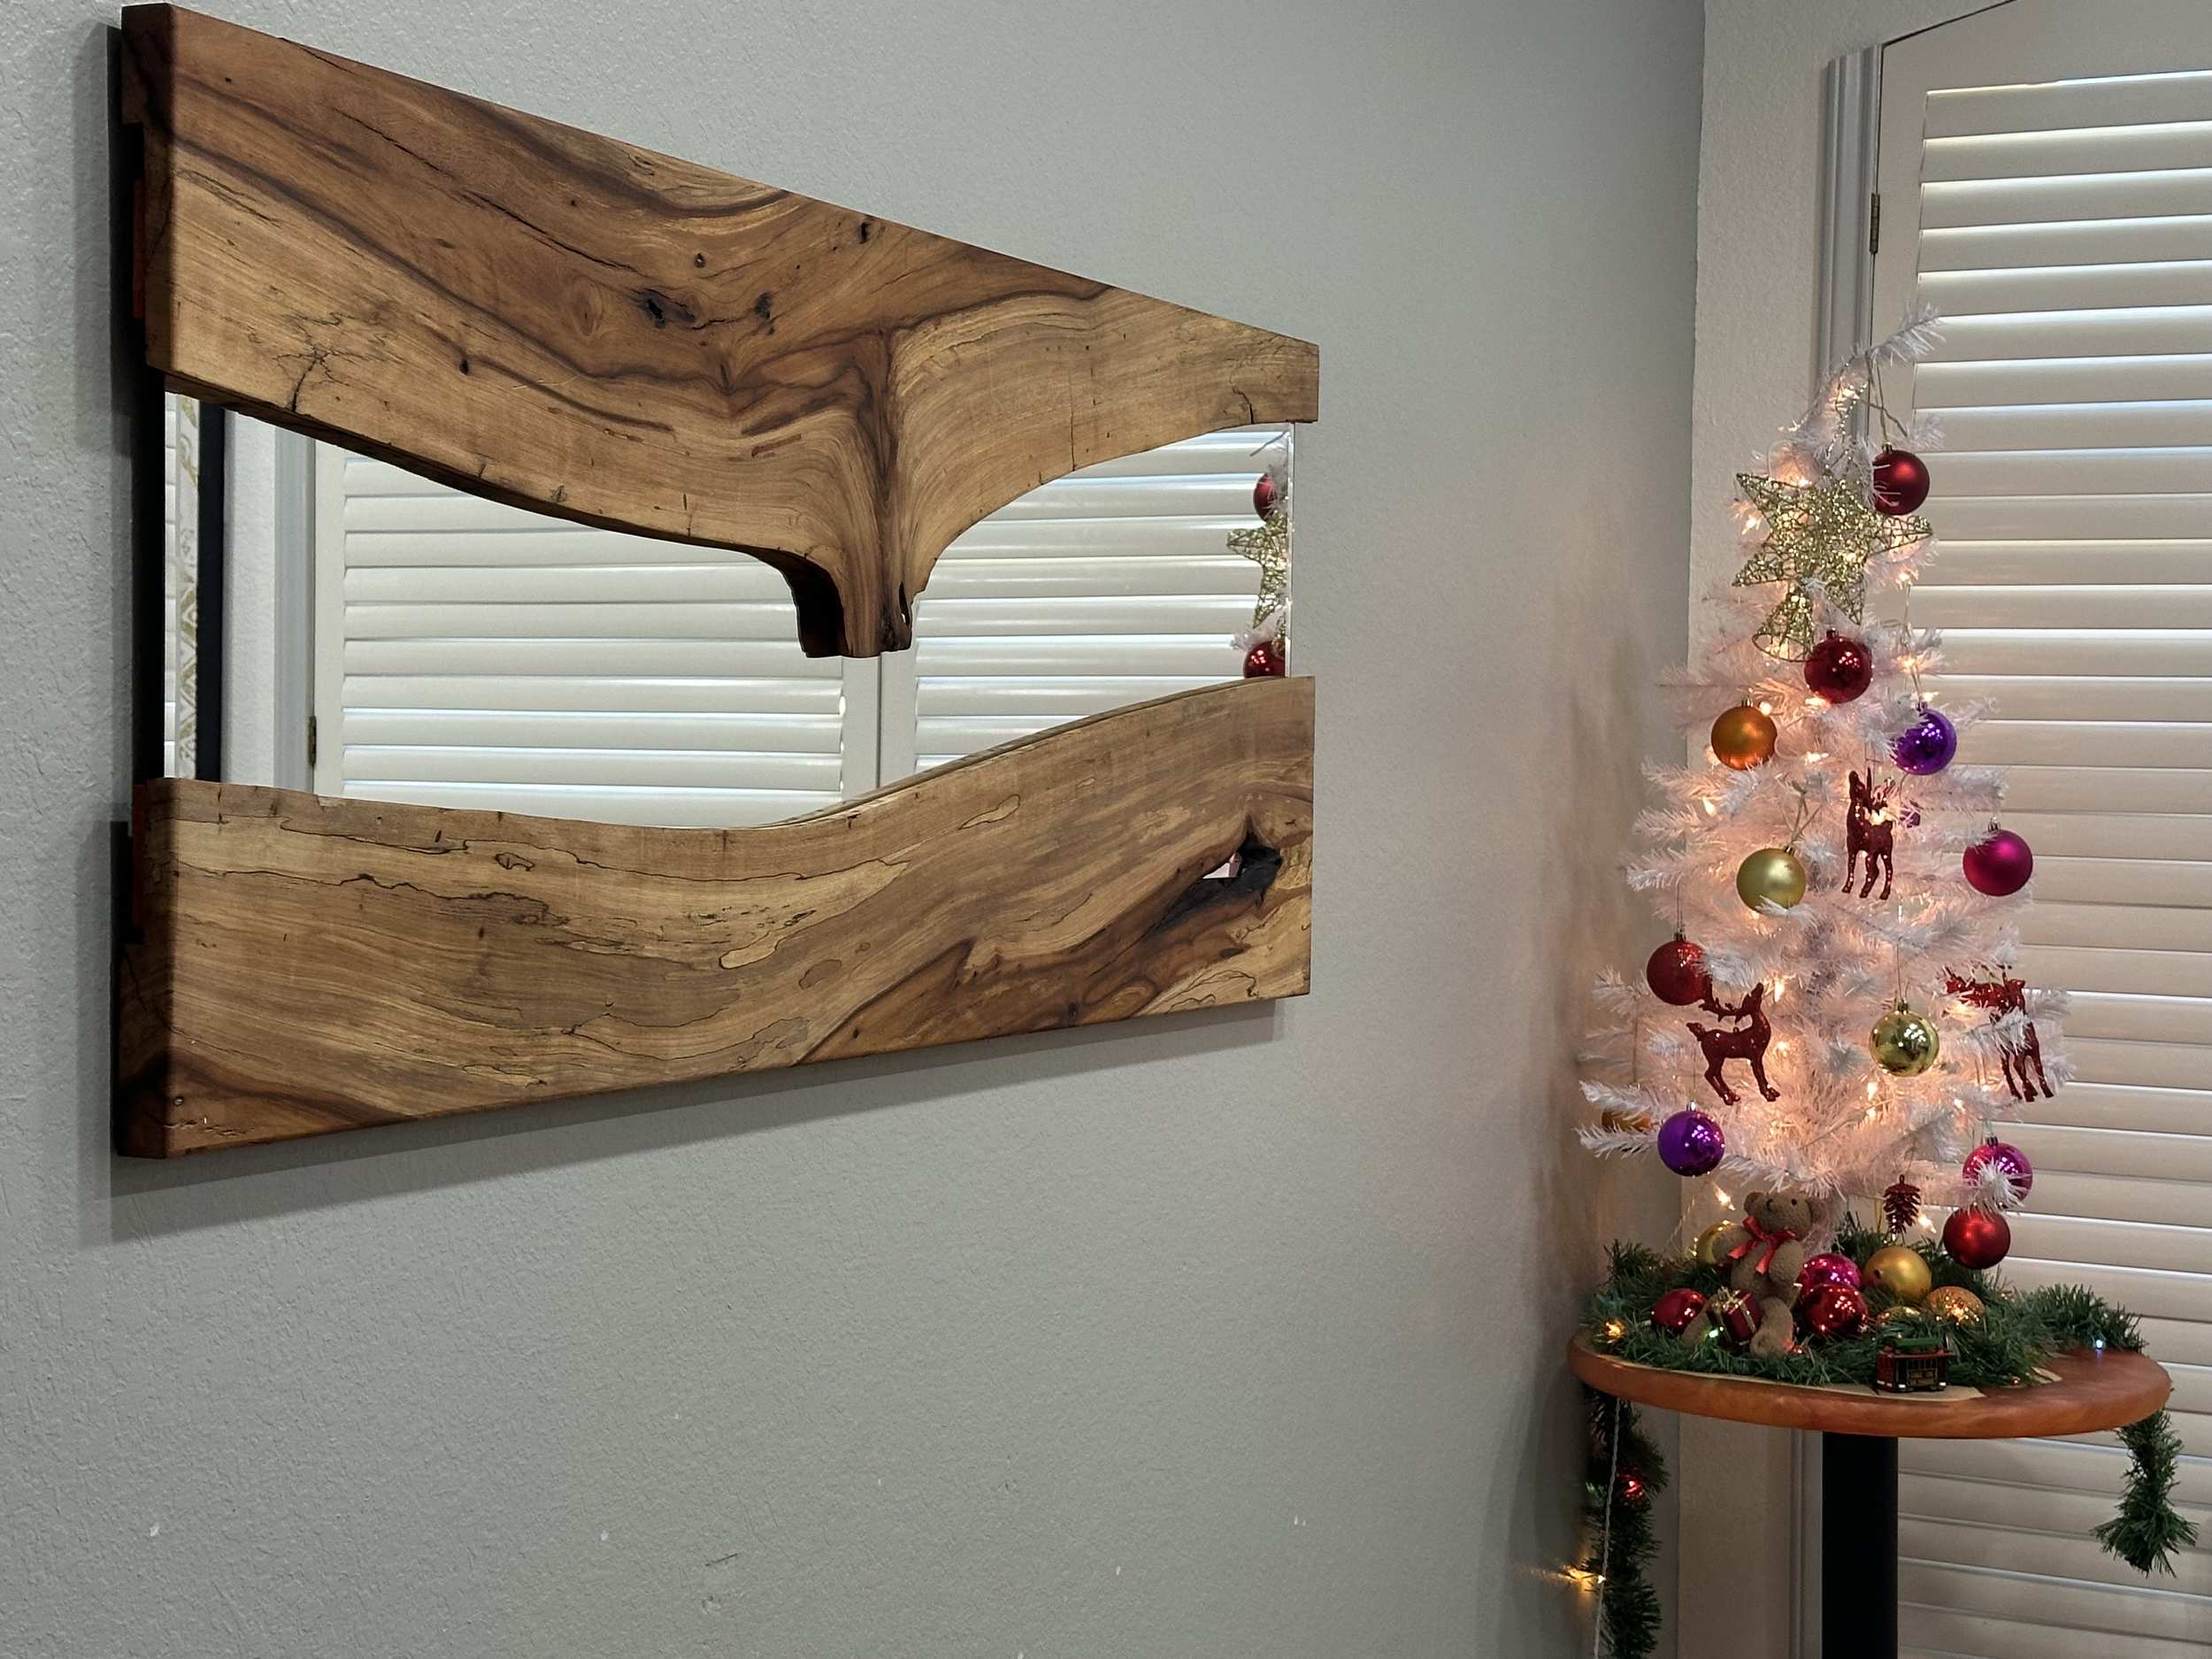
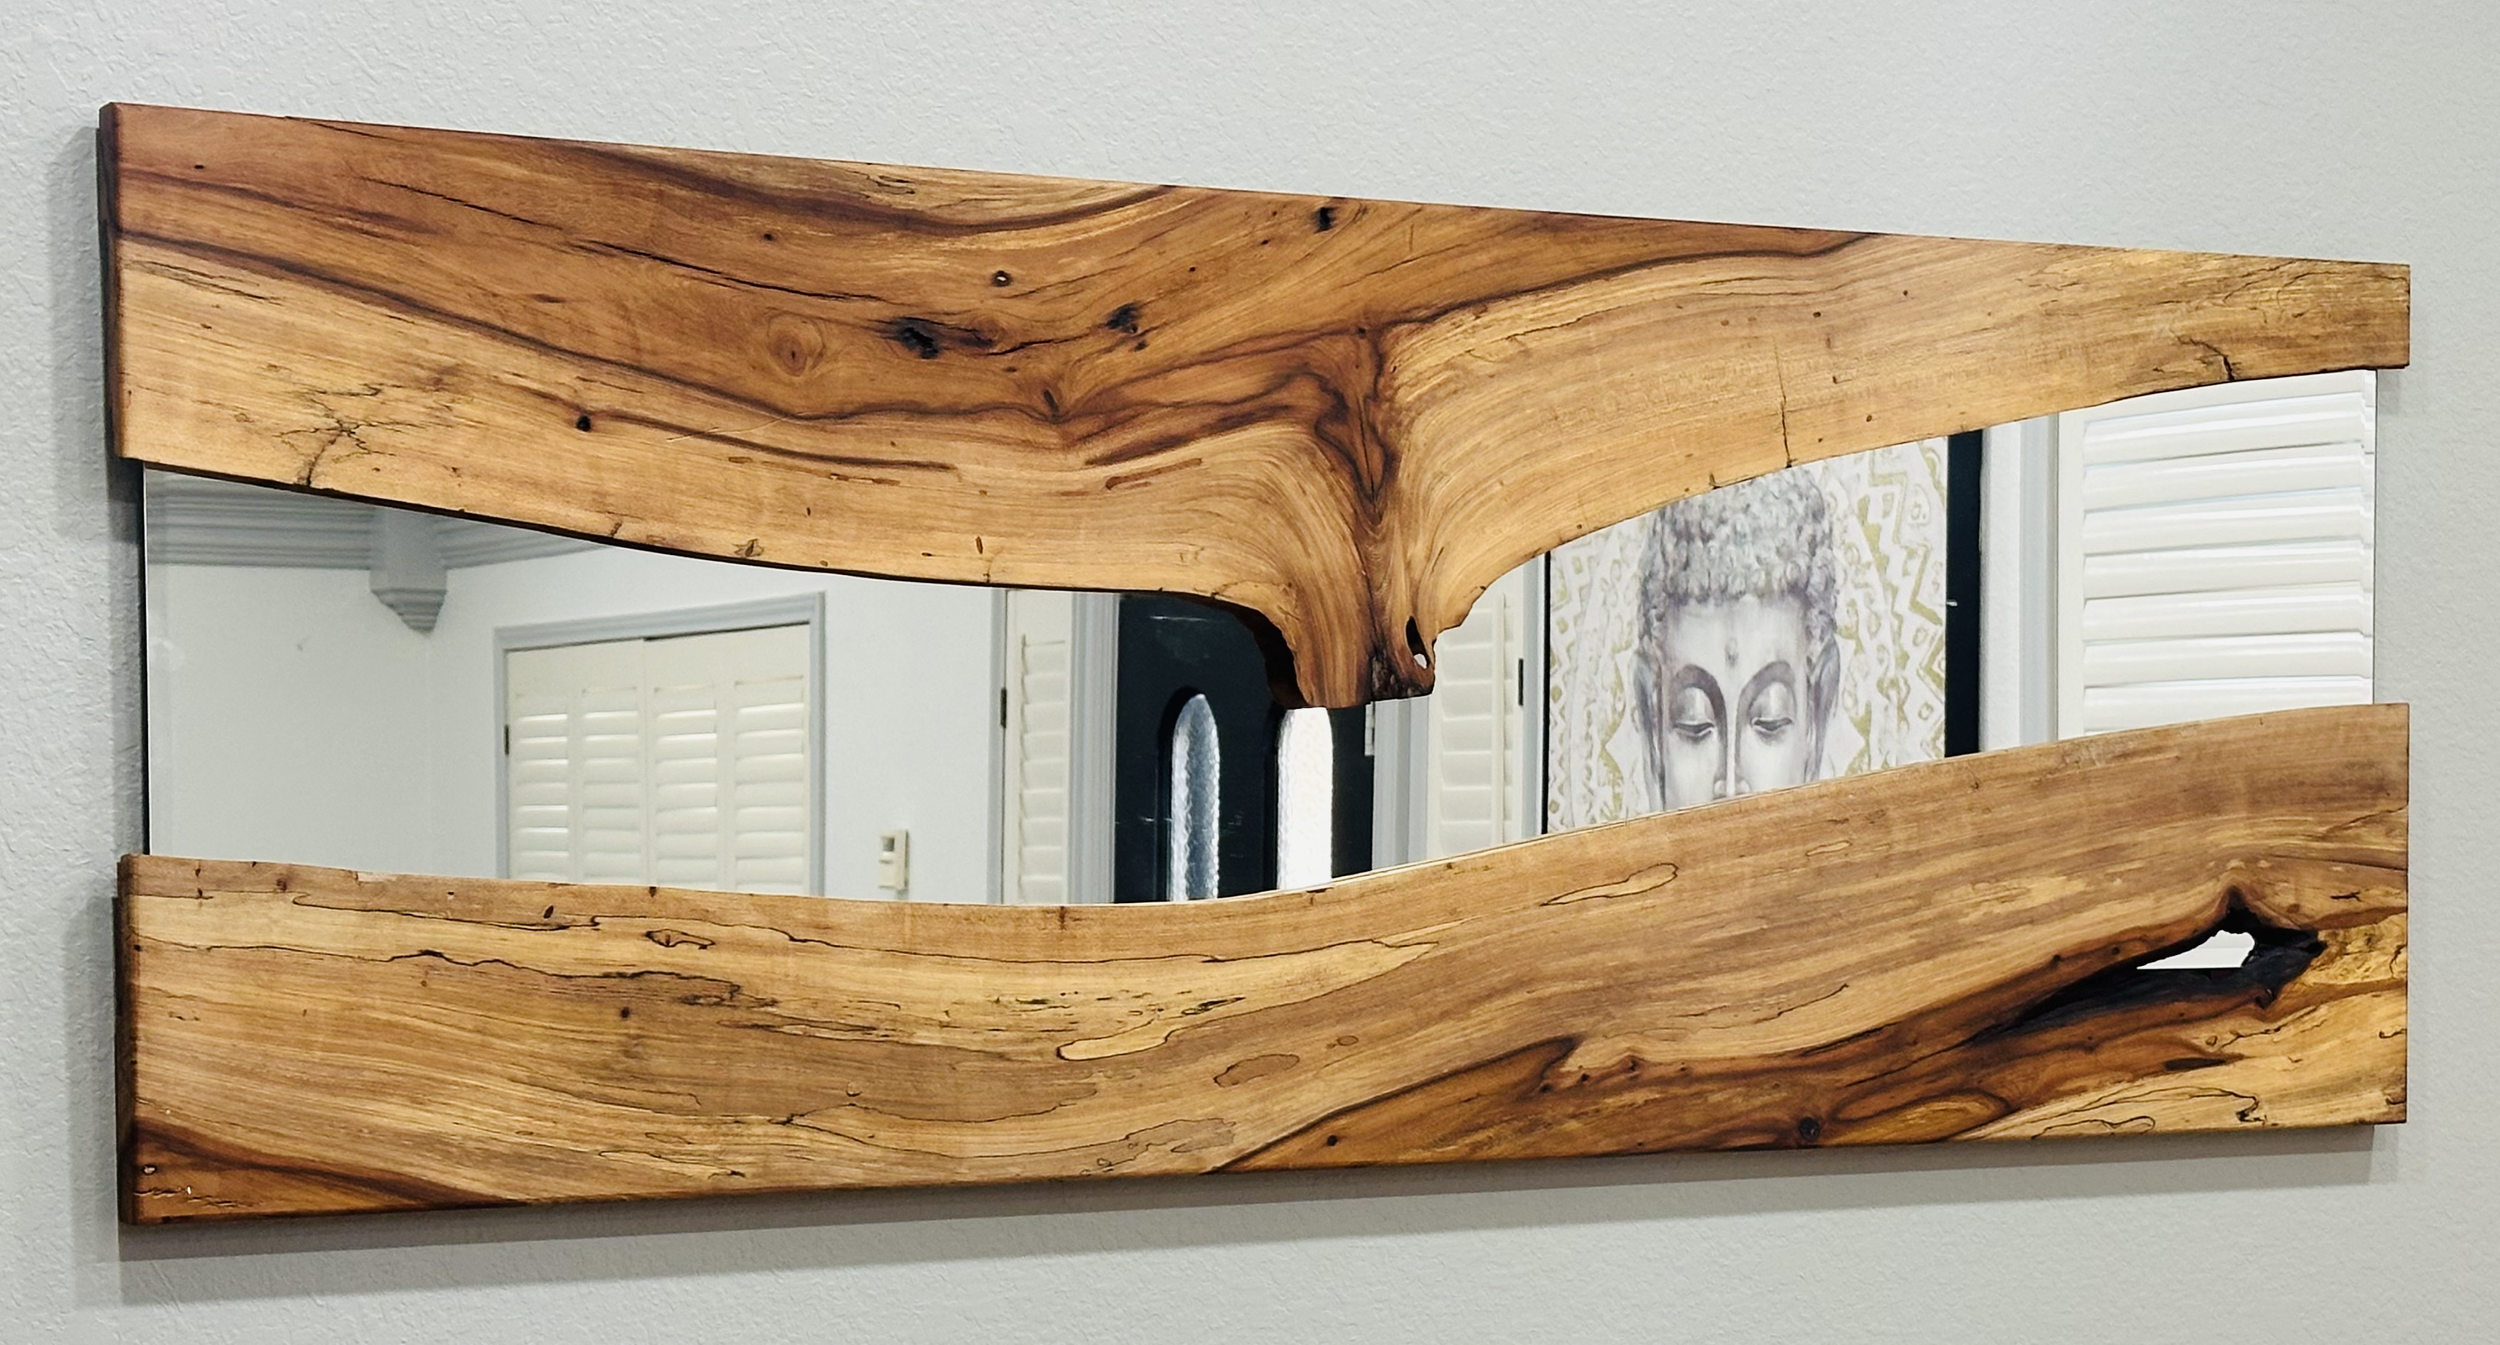
The journey commenced with a visit to Clean Slab Customs in Celina, Texas. Here, amidst an array of stunning elm slabs, each rich in character with cracks, bug holes, and knots, I found the perfect raw materials for my envisioned rustic masterpiece. Opting for authenticity, I deliberately eschewed epoxy, allowing the natural imperfections to emerge and define the personality of my handcrafted live edge accent mirror.
Detailed Design and Preparation
Bringing these unique slabs into my garage, the meticulous process of selection unfolded. Each slab had a story, and I dedicated ample time to deciding which would be the perfect canvas for the mirror and bench. As the mirror design took shape in my mind, I undertook the delicate task of cutting the slab in the middle, ensuring the live edge would be showcased inward. The goal was a harmonious balance, carefully considering symmetry and preserving the natural beauty of the wood, including the captivating knots.
Precision and Perfection
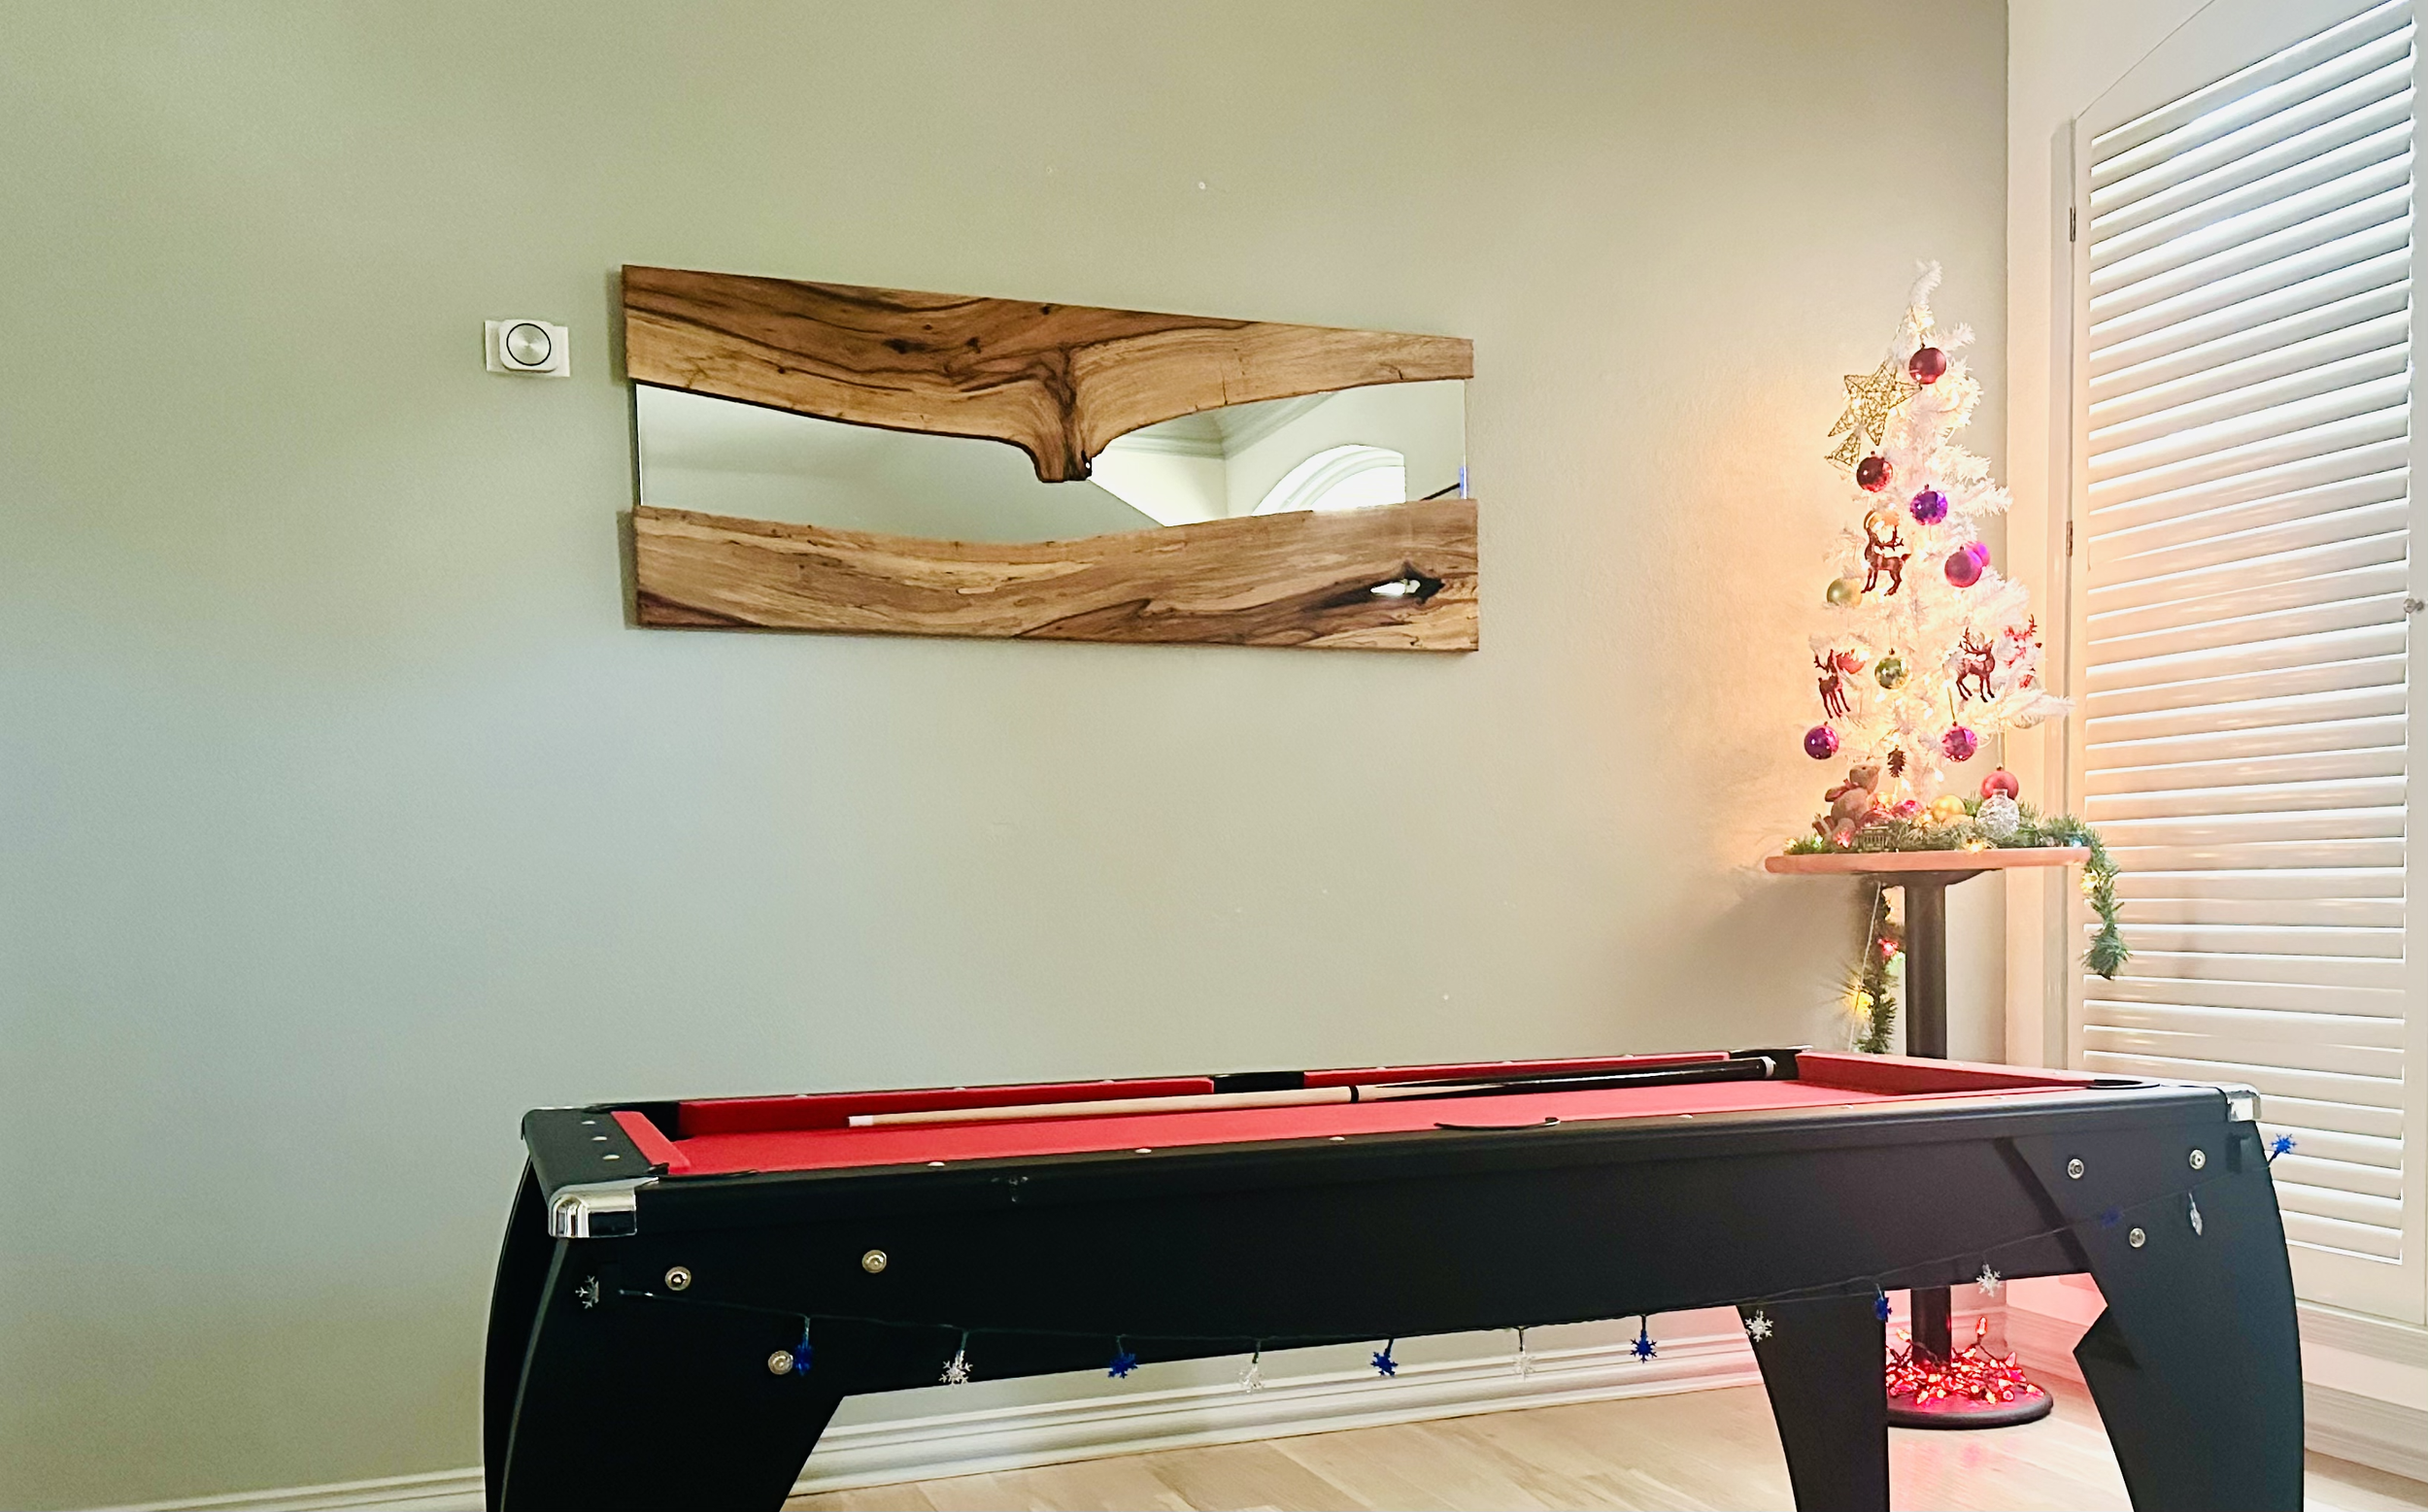
The strategic placement of the pool table near the front door presented a challenge — the mirror would be a prominent focal point for anyone entering. With a deliberate focus on precision and perfection, I approached each step of the build with the utmost care. While perfection might be an elusive goal, the dedicated pursuit of excellence was evident in the creation of a mirror that not only served a functional purpose but also stood as an aesthetically pleasing testament to craftsmanship.
Secure Mirror without Epoxy
The journey continued with the challenge of securely attaching the mirror to the live edge slabs. Departing from conventional methods involving glue or epoxy, I opted for a methodical approach. Carefully routing grooves on both live-edge slabs, I created a secure embrace for the mirror. Hardwood strips, meticulously affixed with screws, ensured a robust connection on the top and bottom. Addressing the sides involved a different strategy, with small pieces of wood firmly attached using CA glue, completing the comprehensive attachment of the mirror to the slabs.
Wall Mounting Considerations
As the mirror build progressed, mounting it on the wall became a contemplative process. While French cleats were considered, the prospect of a cleaner look led me to an alternative approach. Bolts meticulously affixed to the studs, a routed groove on the mirror's top side, and a flush mount against the wall became the chosen method. Despite the security offered by French cleats, a conscious decision prioritized aesthetics, leaving the door open for adjustments in the future if needed.
Conclusion
Embarking on the journey of crafting a rustic live-edge elm mirror and bench not only added aesthetic allure to our home but also unfolded into a fulfilling DIY odyssey. This narrative is an invitation for those seeking a detailed guide, emphasizing the delicate balance between functionality and artistic expression. In the pursuit of timeless elegance, this endeavor stands as a testament to the beauty found in imperfections and the joy derived from crafting something truly unique.
#diy, #doityourself, #woodworking, #woodworkingideas, #video, #sharing, #camera #phone, #video phone, #free, #upload, #howto, #hand made, #power tools, #artist, #how to make rustic mirror, #rustic home accent, #rustic, #wall mirror, #mirror, #home decor ideas, #diy home decor, #home improvements, #accent wall art, #how to make wall art, #how to make live edge, #how to make accent art, #rustic wood working, #how to get rustic wood look, #live edge slabs, #how to use rubio monocoat, #viral
Build Videos
Youtube video - Rustic Elegance: DIY Live Edge Mirror (https://youtu.be/-KnpNTusoqI)
Instagram - Handcrafted DIY Live Edge Mirror (https://www.instagram.com/reel/C0nPF4wv2dU/?utm_source=ig_web_copy_link&igshid=ZTcxMWMzOWQ1OA==
Power tools & hand tools
Power tools
55" Track Saw Guide Rail for Festool - https://amzn.to/3NmCP1h
Festool track saw - https://amzn.to/41iGOlb
Festool 491594 Quick Clamp - https://amzn.to/41dgAAN
6 inch Festool Rotex Sander - Festool 576028 Multi-Mode Sander RO 150 - https://amzn.to/3NkFl8v
6-inch Festool Random orbital Sander -FESTOOL ETS 150/5 EQ-Plus - https://amzn.to/3uQhWFs
Festool 575306 Kapex Sliding Compound Miter Saw - https://amzn.to/48bWuJy
F2 Fusion Tablesaw - https://amzn.to/4abUaE2
Festool 577084 CT 36 E HEPA Dust Extractor - https://amzn.to/4agjdWm
DEWALT Thickness Planer - https://amzn.to/41khICO
DEWALT Planer Stand with Integrated Mobile Base - https://amzn.to/3tdYgek
Bosch Plunge Router & Fixed Base - https://amzn.to/4ahCkzp
Bosch Random Orbital Sander - https://amzn.to/3tkK3vX
Milwaukee's Cordless Compact Router - https://amzn.to/41f48Ay
Milwaukee Cordless Hammer Drill/Impact Driver Combo Kit - https://amzn.to/41j8nLa
Countersink Drill Bit Set - https://amzn.to/47OtLKJ
RYOBI ONE+ HP 18V Brushless Cordless 4-1/2 in - https://amzn.to/3GzZ00g
Angle Grinder Sanding Discs - https://amzn.to/47QkjXw
Freud 8" inch Pro Dado Set - https://amzn.to/4ahqJRc
Freud 3/4" inch Top Bearing Flush Trim Bit Red - https://amzn.to/4afmK7t
CMT General Purpose Saw Blade, 10-inch x 40 Teeth - https://amzn.to/3Rd3leR
Hand tools
Empire 48 in. Drywall T-Square - https://www.homedepot.com/p/Empire-48-in-Drywall-T-Square-410-48/202035306
6 inch Combination Square - https://amzn.to/3GVVqxT
Jorgensen 6" Spreader/Bar Clamps - https://amzn.to/4ae1mzu
FastCap 16 Foot Pro Carpenter Standard Reverse Measuring Tape - https://amzn.to/46XbVEe
MICROJIG GRR-RIPPER GR-100 3D Table Saw Pushblock, Yellow - https://amzn.to/3NldOna
12 Speed Square - https://amzn.to/3RjjpeU
Setup Blocks Height Gauge Set, 15pcs Precision Aluminum Setup Bars - https://amzn.to/3RycP5A